Content
Unlocking AI Automation: A Beginner's Guide to Streamlining Your Tasks
Unlocking AI Automation: A Beginner's Guide to Streamlining Your Tasks
Unlocking AI Automation: A Beginner's Guide to Streamlining Your Tasks
Danny Roman
November 28, 2024



Are you ready to supercharge your productivity with AI automation? In this guide, we'll take you through a step-by-step process to automate tasks using ChatGPT and Zapier, making your work life easier and more efficient. Let's dive into the transformative world of automation!
🚀 Introduction to AI Automation
Welcome to the future of productivity! AI automation is not just a buzzword; it’s a game-changer. Imagine having mundane tasks taken off your plate while you focus on what truly matters. With AI, you can streamline your workflow, reduce errors, and save precious time. It’s like having a personal assistant that never sleeps!
From generating email subject lines to managing complex workflows, AI can handle it all. And the best part? You don’t need to be a tech wizard to get started. With tools like Zapier, you can automate tasks in just a few clicks. Get ready to unleash the power of automation!
🛠️ Creating Your First Automation
Alright, let’s roll up our sleeves and dive into the nitty-gritty of automation. Creating your first automation is as easy as pie. Here’s the secret: you’ll be using triggers and actions. A trigger is the event that kicks off your automation, while actions are the tasks that follow.
Don’t worry; it sounds more complicated than it is. For instance, when you upload a file to Dropbox (the trigger), you can automatically generate email subject lines using ChatGPT (the action). It’s a beautiful dance of efficiency!

📋 Setting Up Your Zapier Account
First things first, head over to Zapier.com and sign up for an account. You can use your Google account for a quick setup. Once you’re logged in, you’ll see your dashboard, where all the magic happens.
Zapier operates on a “zap” system, where each automation counts as one zap. You’ll start with a free tier, perfect for experimenting. Once you’ve tasted the sweetness of automation, you might want to explore paid plans for more zaps!
🔄 Understanding Triggers in Automation
Let’s talk triggers! Think of triggers as the starting gun at a race. They signal the start of your automation journey. It could be anything from receiving an email, a new file in a folder, or even a scheduled time.
For our example, we’ll set up a trigger that activates when a new file is dropped into a specific Dropbox folder. This will start the automation that generates email subject lines. Simple, right?
📂 Choosing Your Trigger App: Dropbox
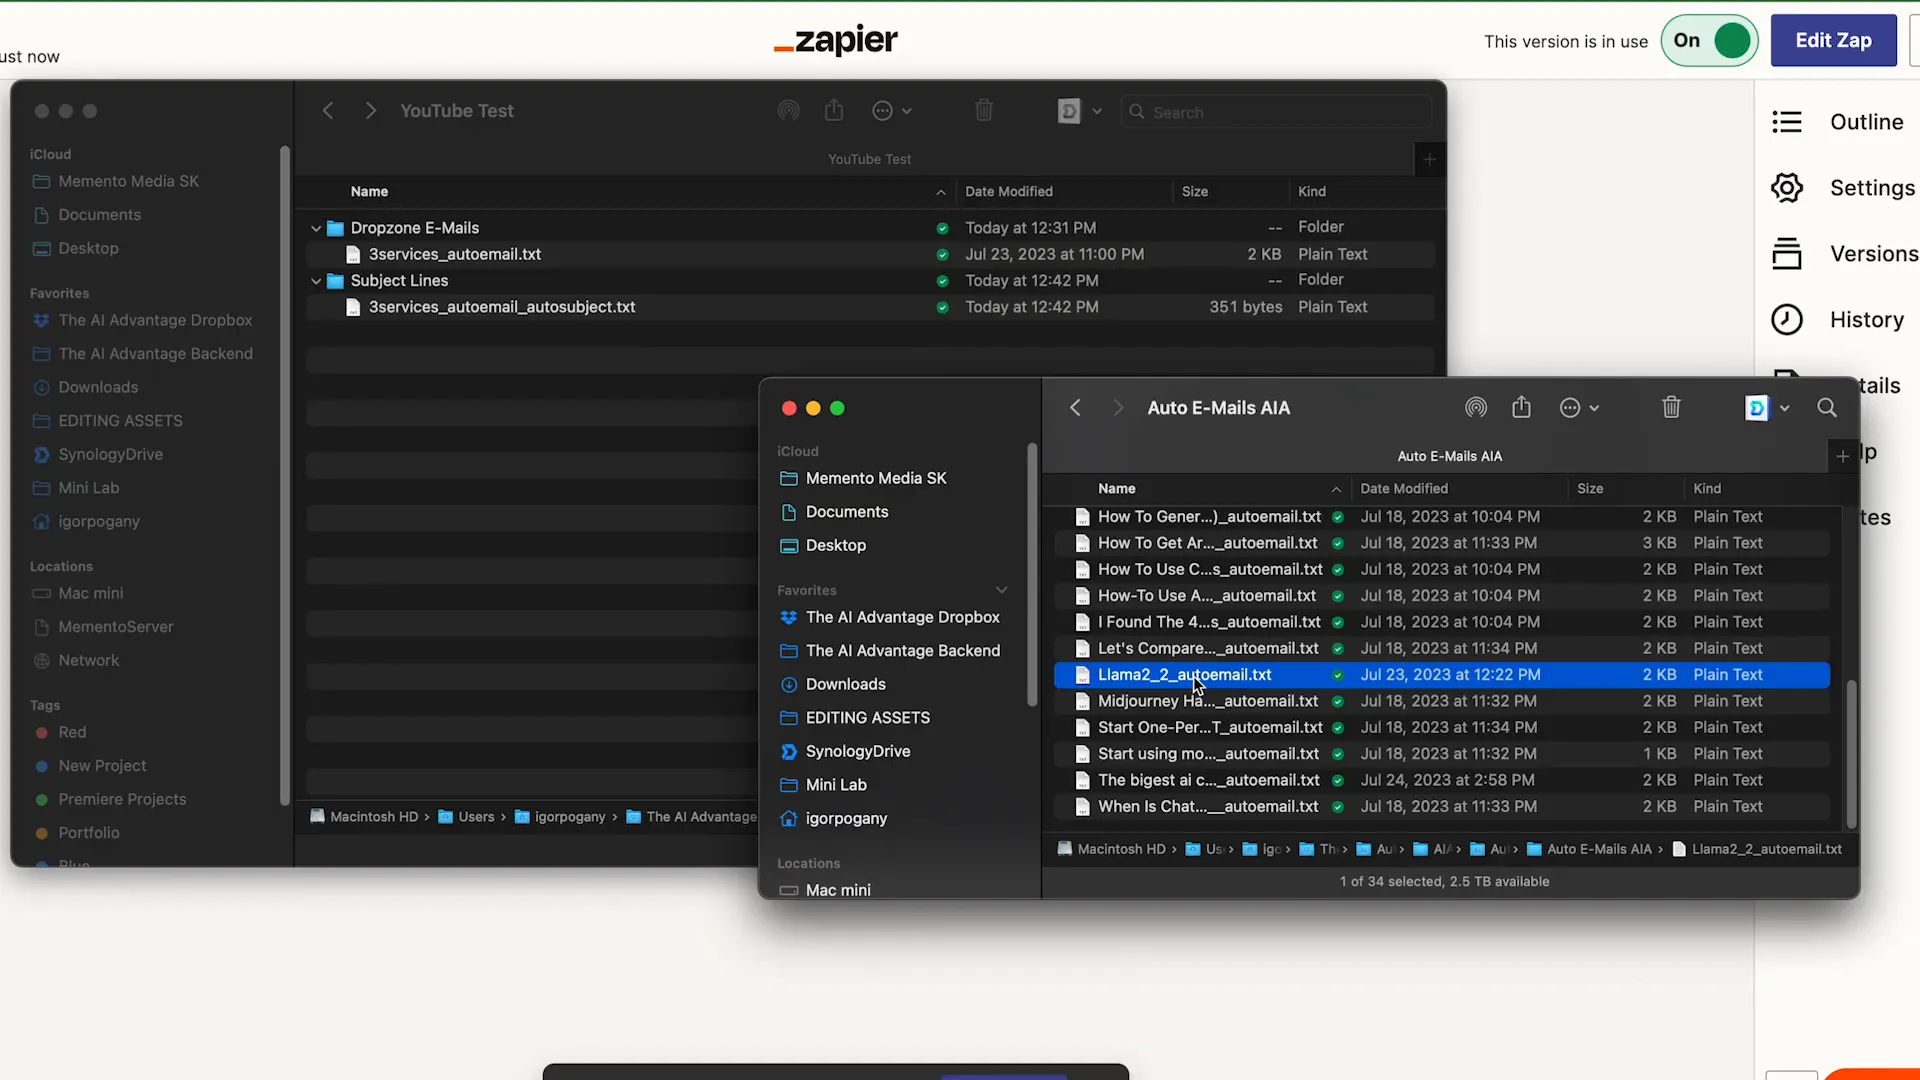
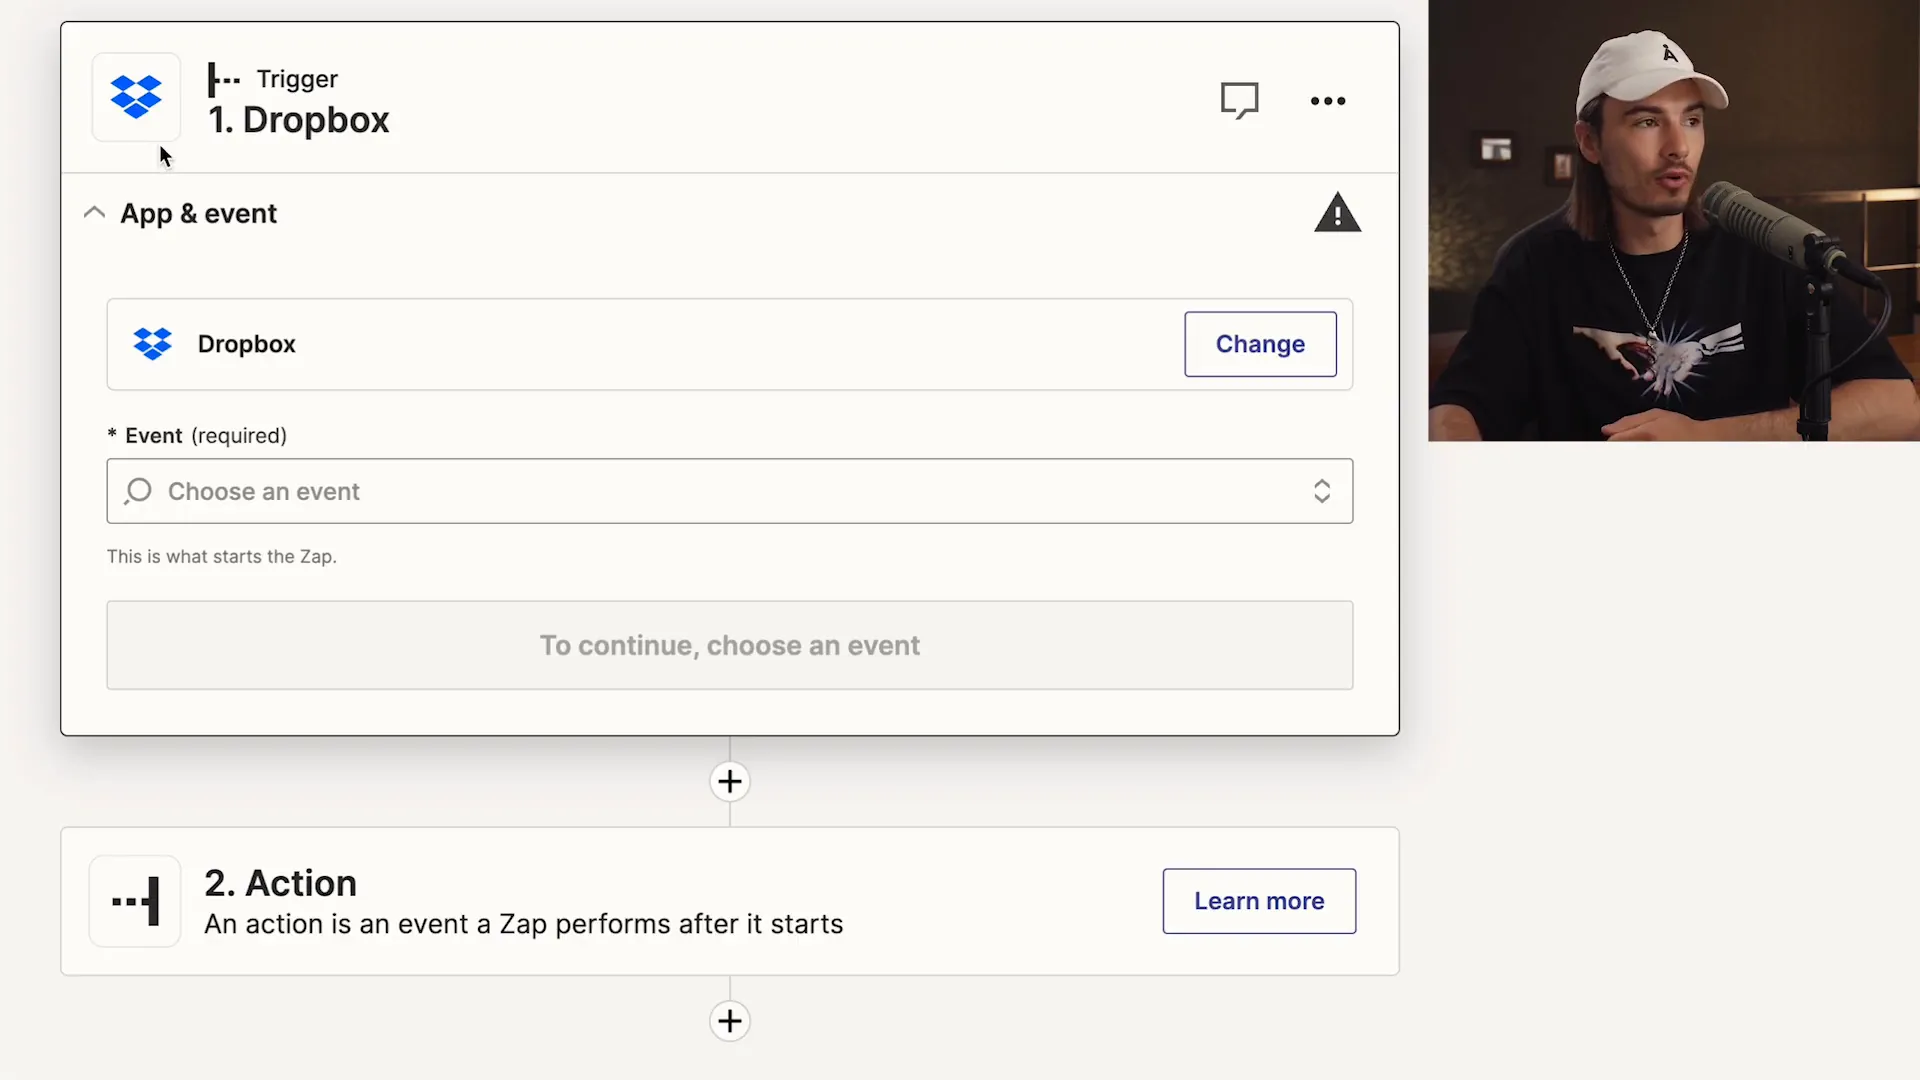
Dropbox is a fantastic choice for our trigger app. It’s user-friendly and integrates seamlessly with Zapier. When you select Dropbox, you’ll have options to choose what event will trigger the automation. In our case, it’s “New File in Folder.”
This means every time you add a new file to your designated folder, the automation will spring into action. Talk about efficiency!
🗂️ Creating Folders for Organization
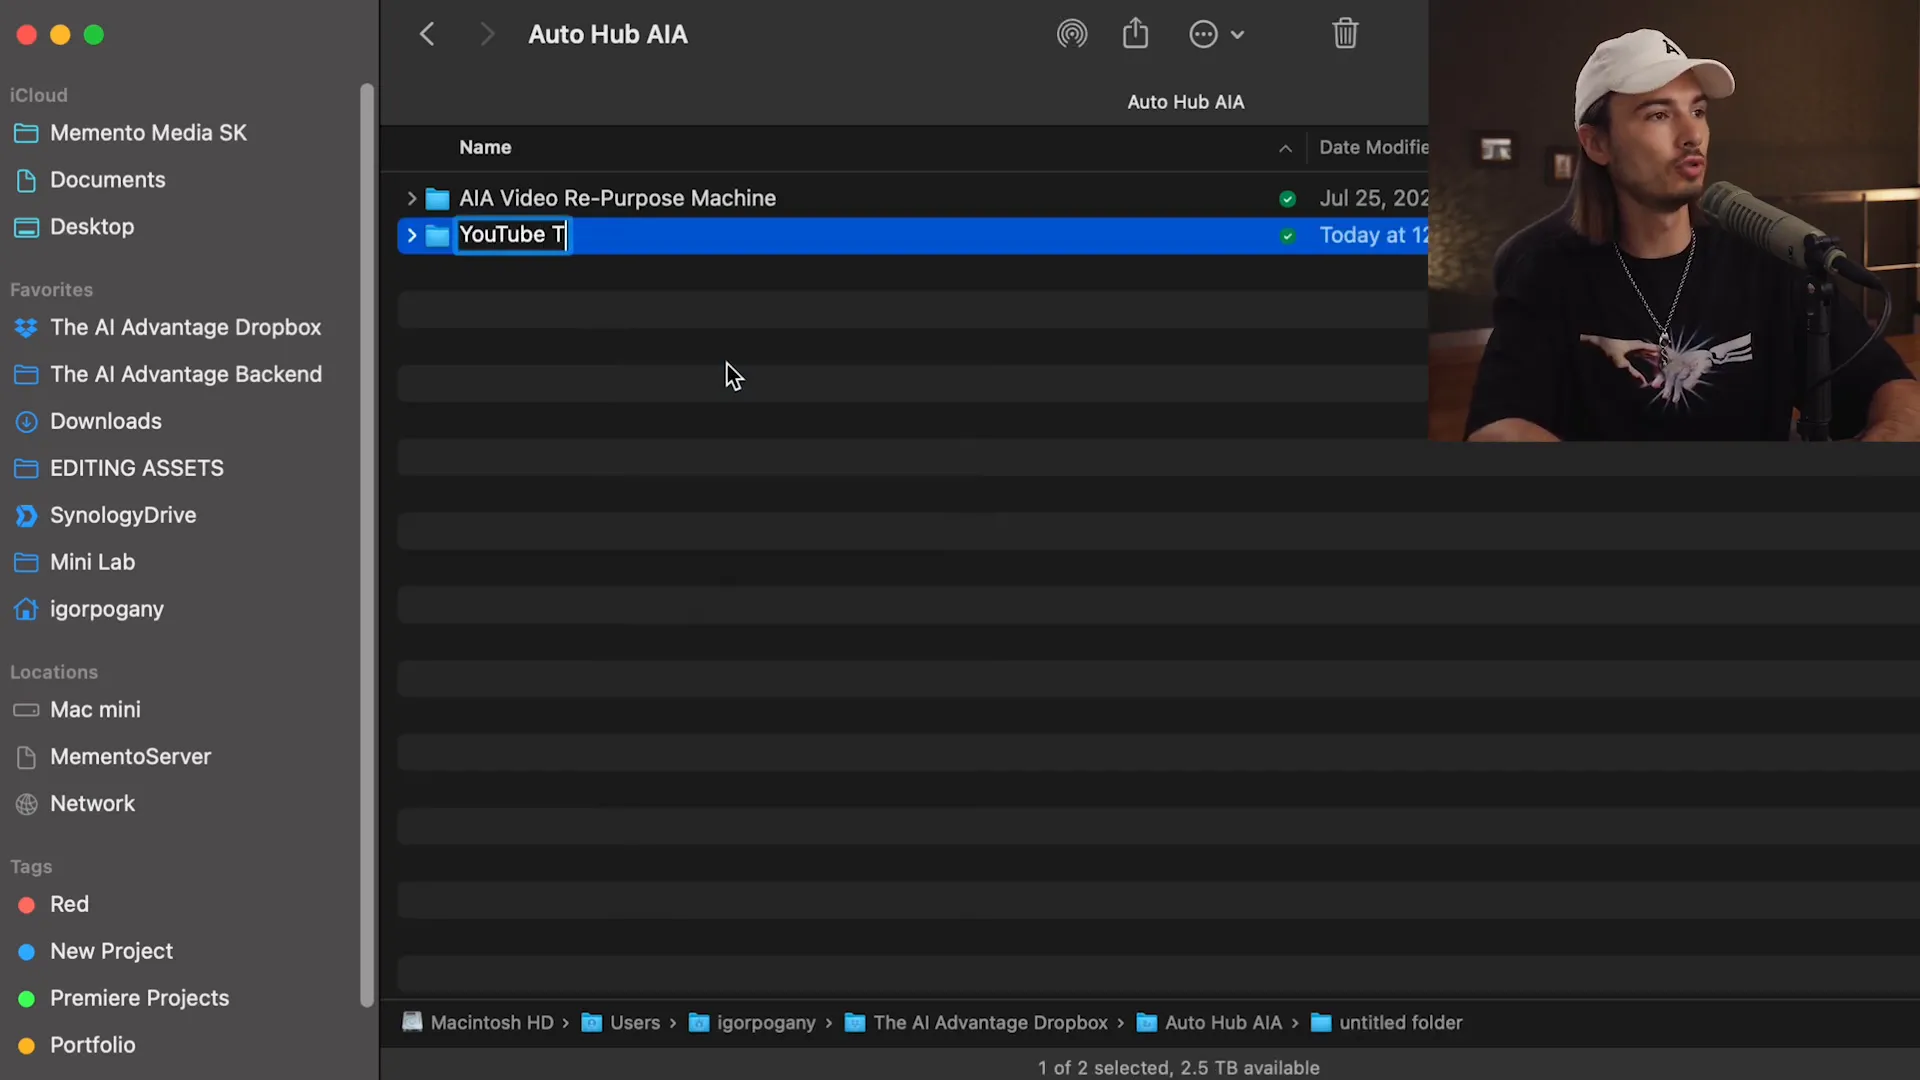
Organization is key in automation. You’ll want to create specific folders in your Dropbox to manage your files effectively. For our automation, set up a folder called “Drop Zone Emails” where you’ll drop your email files and another folder named “Subject Lines” for the generated outputs.
This way, everything is neatly organized, and you can easily find your files. Plus, it makes your automation process smoother!
🧪 Testing Your Trigger Setup
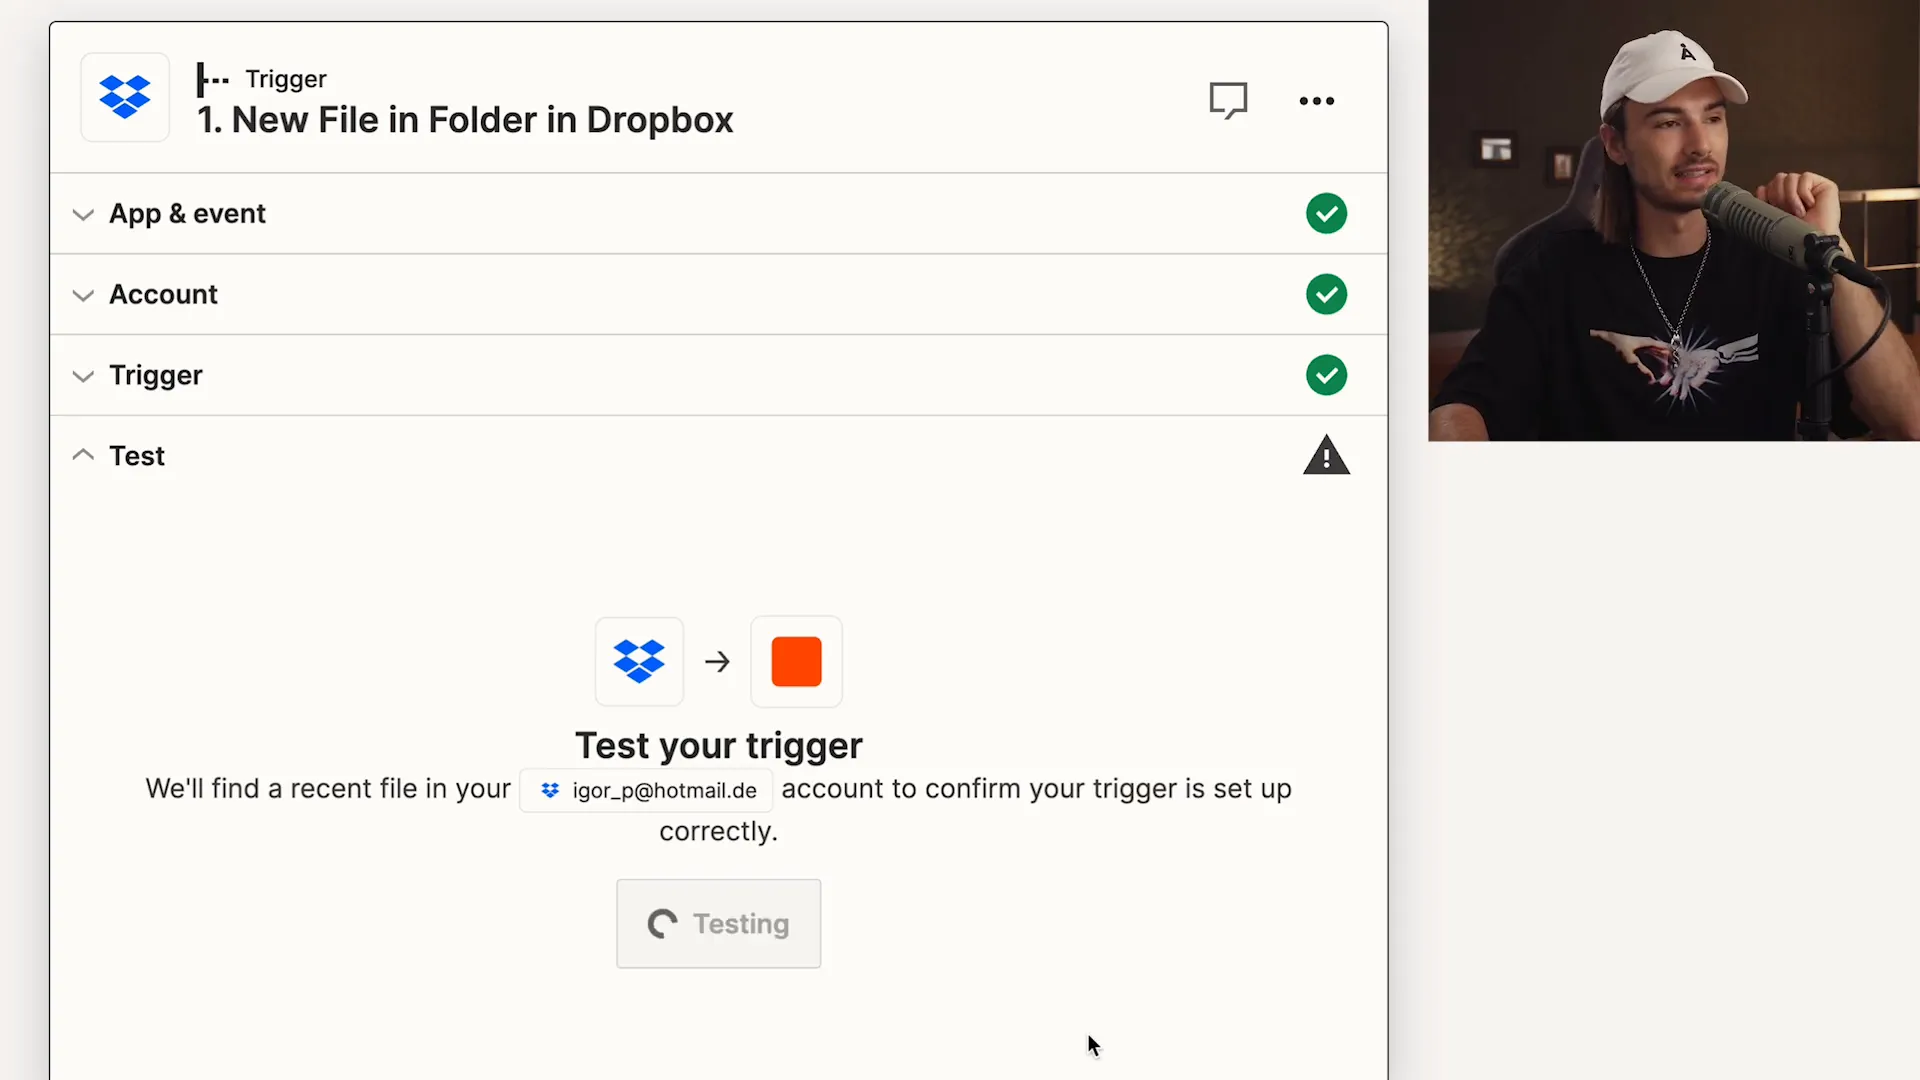
Before you go full throttle, it’s time to test your setup. Testing ensures everything works as intended. After setting up your trigger, drop a test file into your “Drop Zone Emails” folder and watch the magic happen.
Zapier will scan the folder, and if everything is set up correctly, it will recognize the new file and prepare to trigger the next actions. You’re just a few clicks away from automation bliss!
🔍 Defining Actions After Trigger
Now that you've set up your trigger, it's time to define the actions that follow. This is where the real magic happens! Actions are the tasks that get executed once your trigger is activated. Think of it as the domino effect—once the first one falls (the trigger), the rest will follow seamlessly.
For our automation, we’re focusing on two actions: generating email subject lines with ChatGPT and saving the results in a designated folder. This combination not only saves time but also enhances your productivity. Let's dive deeper into how to set these actions up!
💬 Setting Up ChatGPT as an Action
First up, let’s integrate ChatGPT into your automation! Select ChatGPT as your action app. This will allow you to send prompts and receive responses directly from the AI. You’ll need to choose the event that will trigger the ChatGPT interaction. In this case, we're going with the 'Conversation' event.
After selecting the event, connect your OpenAI account. This seamless integration is crucial for ensuring that your prompts are sent efficiently and the responses are received without a hitch.
📝 Crafting Effective Prompts for ChatGPT
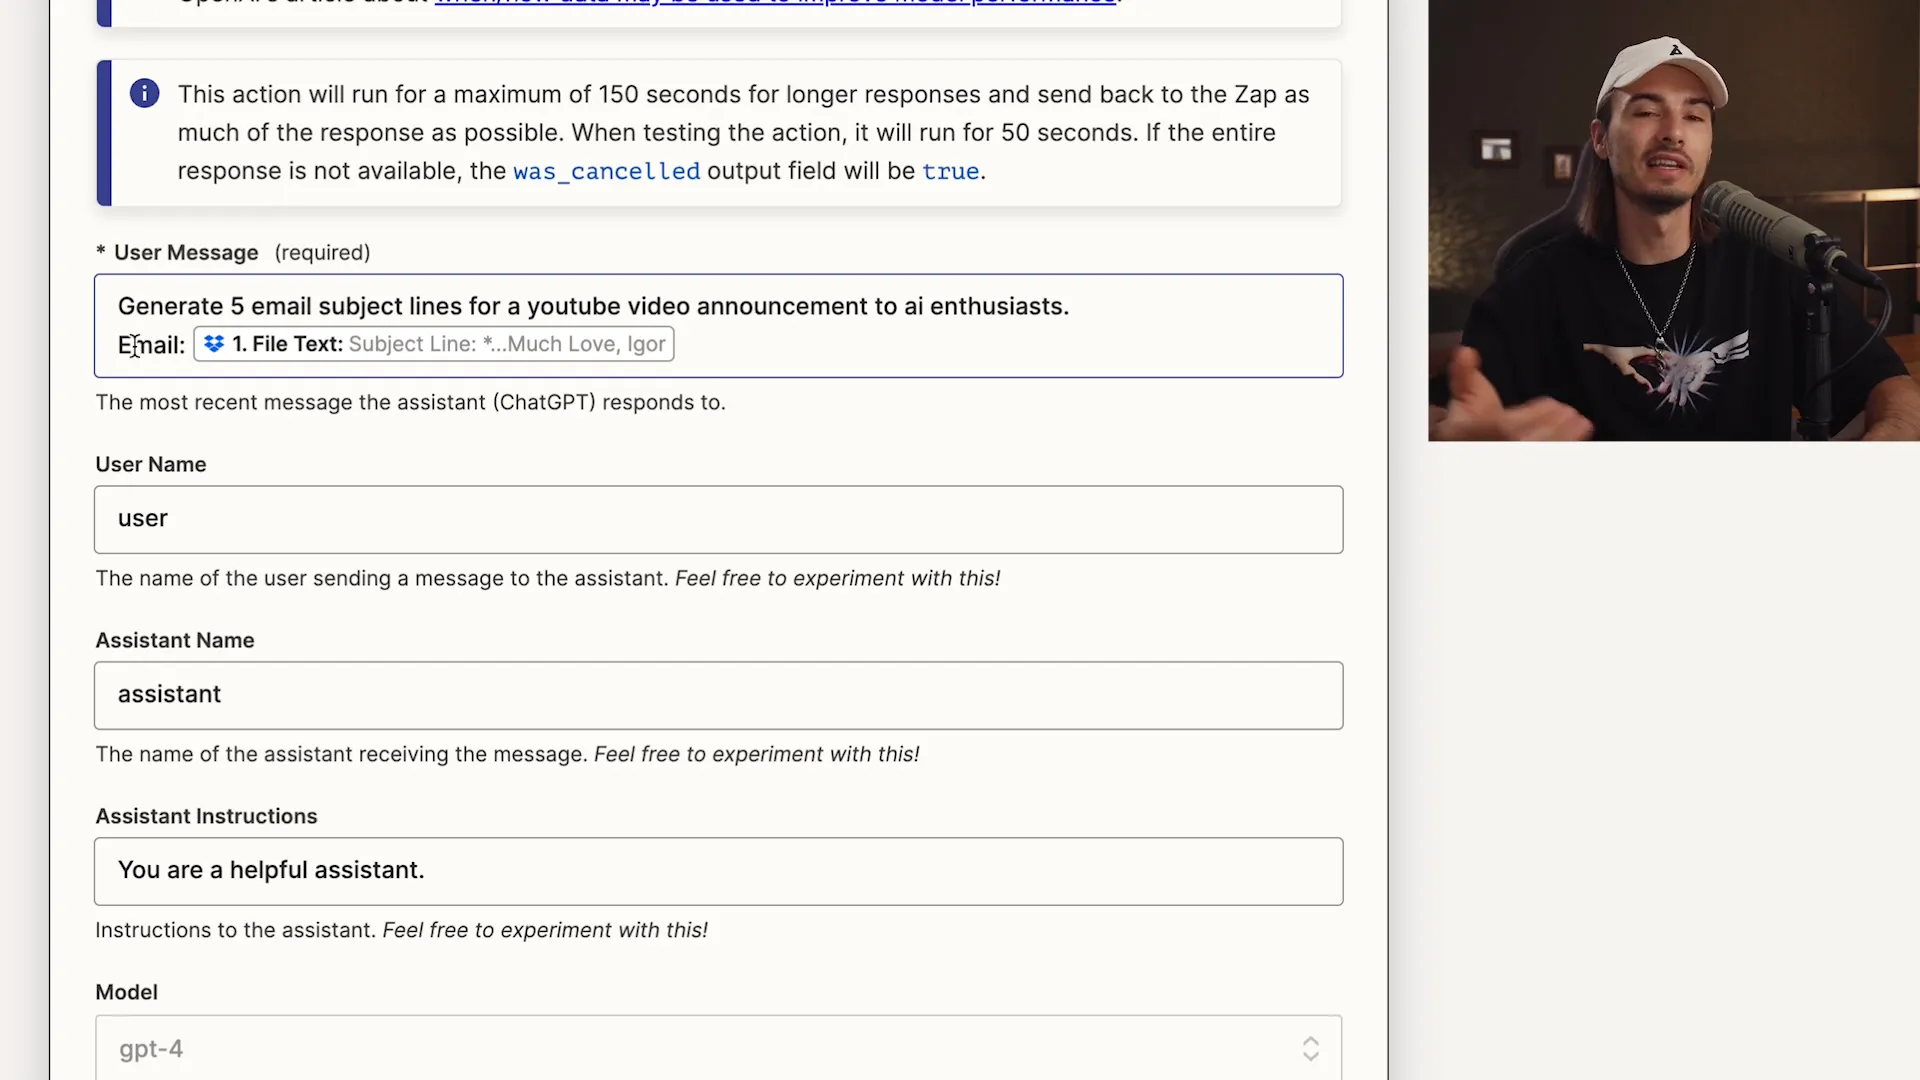
Crafting the right prompt is key to getting the best results from ChatGPT. It’s not just about what you ask; it’s about how you ask it. Start with a clear instruction, like "Generate five email subject lines for a YouTube video announcement." This specificity helps the AI understand your needs better!
Also, consider using template structures that can be easily modified for different scenarios. The more tailored your prompt, the more relevant the output. Don't forget to utilize the email content from the previous step in your prompt to make it even more contextual!
💾 Saving Outputs to Your Chosen Location
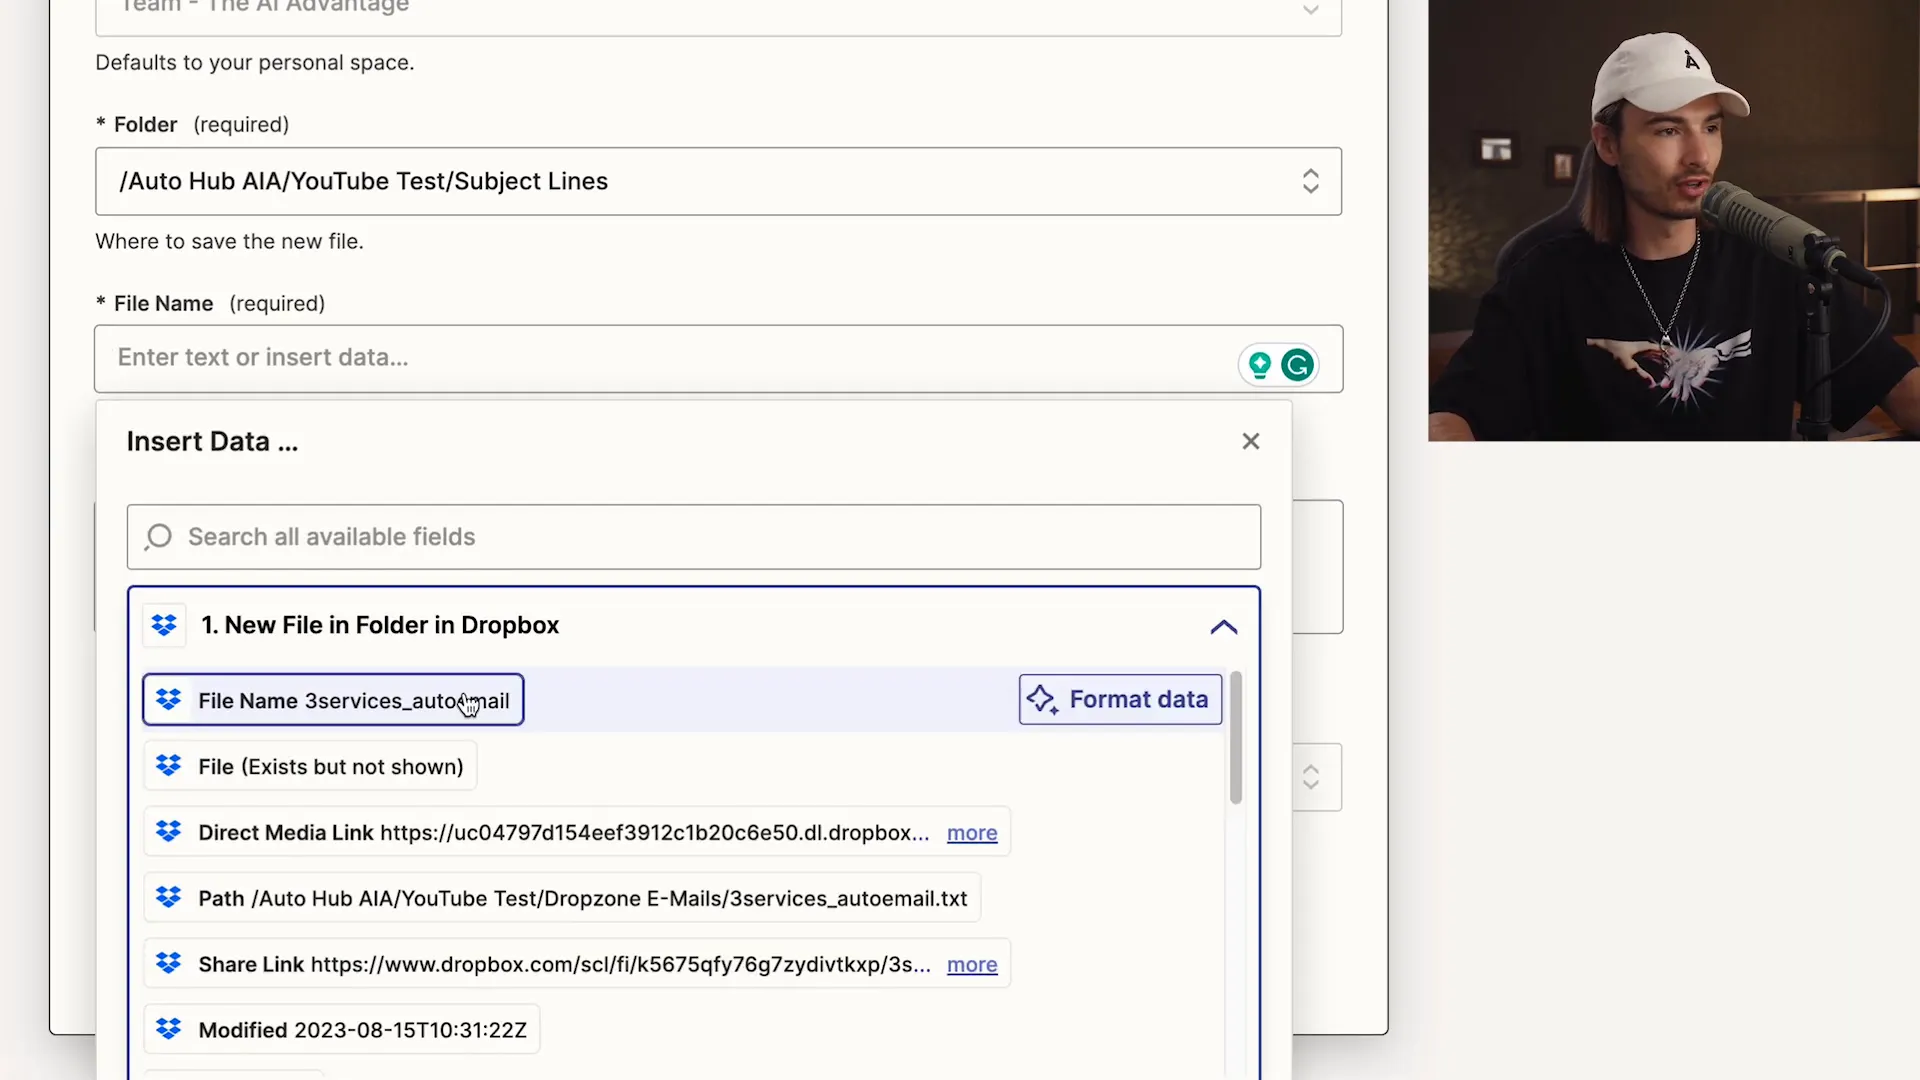
Once you’ve got those catchy subject lines from ChatGPT, it’s time to save them! You can choose to save outputs in various formats and locations, but for simplicity, let’s save them as text files in the designated "Subject Lines" folder in Dropbox.
When setting this up, you'll need to specify both the file name and the content. A good practice is to use the original file name with a suffix, such as "_AutoSubject," to easily identify generated files later. For the content, simply pull in the response from the ChatGPT step—it’s that straightforward!
⚙️ Finalizing and Testing Your Automation
Almost there! After defining your actions, it’s crucial to finalize your automation. This involves reviewing each step to ensure everything is set up correctly. Once you’re satisfied, it’s time to test your automation. Testing is the ultimate safety net—it ensures everything runs smoothly once you go live!
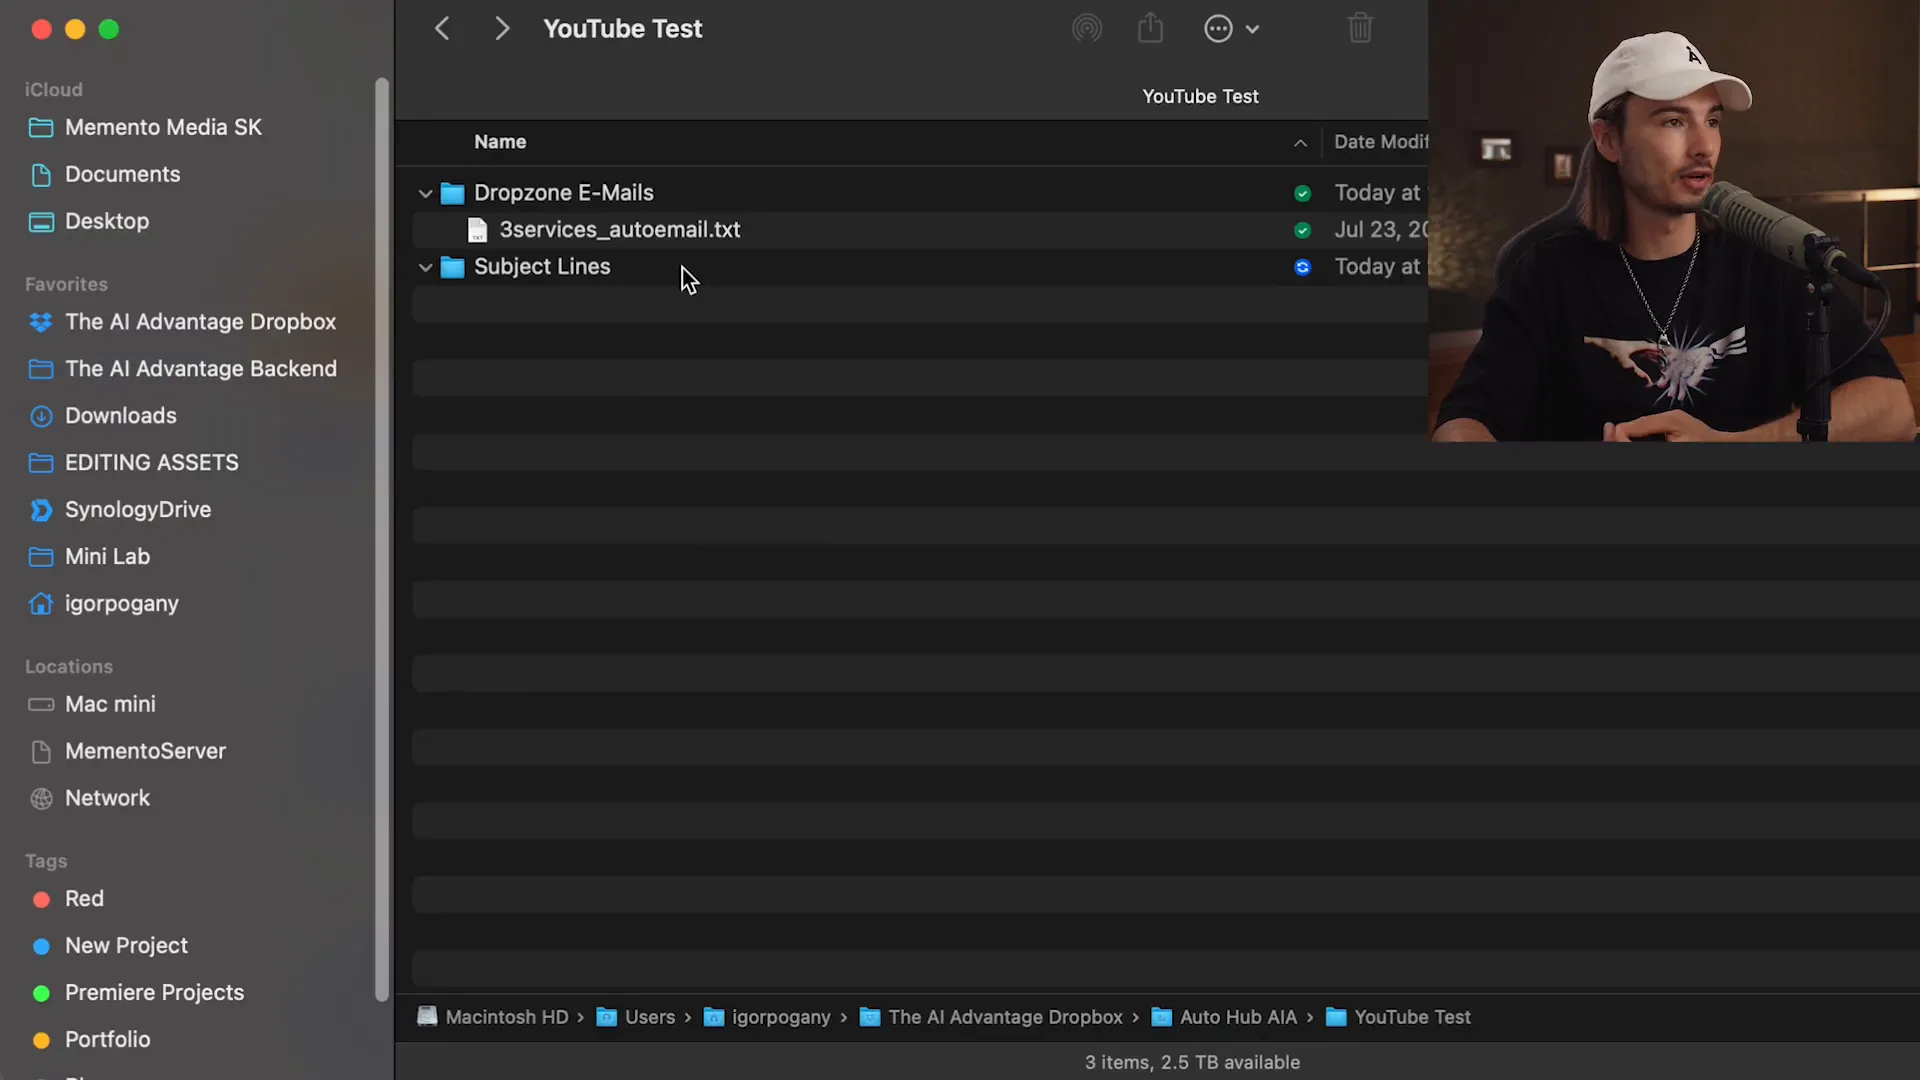
Simply drop a test file into your "Drop Zone Emails" folder, and watch as the automation triggers, generating subject lines and saving them in the "Subject Lines" folder. If everything works as planned, you’re ready to publish your automation!
🎨 Customizing Your Automation Experience
The beauty of automation lies in its flexibility. Once you’ve got the basics down, you can customize your automation to fit your specific needs. Want to add more actions? Go for it! You can integrate additional apps and create a more complex workflow that suits your business perfectly.
Experiment with different triggers and actions—there are thousands of combinations available. The key is to find what works best for you and your workflow. Remember, the goal is to make your life easier and your work more efficient!
Are you ready to supercharge your productivity with AI automation? In this guide, we'll take you through a step-by-step process to automate tasks using ChatGPT and Zapier, making your work life easier and more efficient. Let's dive into the transformative world of automation!
🚀 Introduction to AI Automation
Welcome to the future of productivity! AI automation is not just a buzzword; it’s a game-changer. Imagine having mundane tasks taken off your plate while you focus on what truly matters. With AI, you can streamline your workflow, reduce errors, and save precious time. It’s like having a personal assistant that never sleeps!
From generating email subject lines to managing complex workflows, AI can handle it all. And the best part? You don’t need to be a tech wizard to get started. With tools like Zapier, you can automate tasks in just a few clicks. Get ready to unleash the power of automation!
🛠️ Creating Your First Automation
Alright, let’s roll up our sleeves and dive into the nitty-gritty of automation. Creating your first automation is as easy as pie. Here’s the secret: you’ll be using triggers and actions. A trigger is the event that kicks off your automation, while actions are the tasks that follow.
Don’t worry; it sounds more complicated than it is. For instance, when you upload a file to Dropbox (the trigger), you can automatically generate email subject lines using ChatGPT (the action). It’s a beautiful dance of efficiency!

📋 Setting Up Your Zapier Account
First things first, head over to Zapier.com and sign up for an account. You can use your Google account for a quick setup. Once you’re logged in, you’ll see your dashboard, where all the magic happens.
Zapier operates on a “zap” system, where each automation counts as one zap. You’ll start with a free tier, perfect for experimenting. Once you’ve tasted the sweetness of automation, you might want to explore paid plans for more zaps!
🔄 Understanding Triggers in Automation
Let’s talk triggers! Think of triggers as the starting gun at a race. They signal the start of your automation journey. It could be anything from receiving an email, a new file in a folder, or even a scheduled time.
For our example, we’ll set up a trigger that activates when a new file is dropped into a specific Dropbox folder. This will start the automation that generates email subject lines. Simple, right?

📂 Choosing Your Trigger App: Dropbox
Dropbox is a fantastic choice for our trigger app. It’s user-friendly and integrates seamlessly with Zapier. When you select Dropbox, you’ll have options to choose what event will trigger the automation. In our case, it’s “New File in Folder.”
This means every time you add a new file to your designated folder, the automation will spring into action. Talk about efficiency!

🗂️ Creating Folders for Organization
Organization is key in automation. You’ll want to create specific folders in your Dropbox to manage your files effectively. For our automation, set up a folder called “Drop Zone Emails” where you’ll drop your email files and another folder named “Subject Lines” for the generated outputs.
This way, everything is neatly organized, and you can easily find your files. Plus, it makes your automation process smoother!

🧪 Testing Your Trigger Setup
Before you go full throttle, it’s time to test your setup. Testing ensures everything works as intended. After setting up your trigger, drop a test file into your “Drop Zone Emails” folder and watch the magic happen.
Zapier will scan the folder, and if everything is set up correctly, it will recognize the new file and prepare to trigger the next actions. You’re just a few clicks away from automation bliss!

🔍 Defining Actions After Trigger
Now that you've set up your trigger, it's time to define the actions that follow. This is where the real magic happens! Actions are the tasks that get executed once your trigger is activated. Think of it as the domino effect—once the first one falls (the trigger), the rest will follow seamlessly.
For our automation, we’re focusing on two actions: generating email subject lines with ChatGPT and saving the results in a designated folder. This combination not only saves time but also enhances your productivity. Let's dive deeper into how to set these actions up!
💬 Setting Up ChatGPT as an Action
First up, let’s integrate ChatGPT into your automation! Select ChatGPT as your action app. This will allow you to send prompts and receive responses directly from the AI. You’ll need to choose the event that will trigger the ChatGPT interaction. In this case, we're going with the 'Conversation' event.
After selecting the event, connect your OpenAI account. This seamless integration is crucial for ensuring that your prompts are sent efficiently and the responses are received without a hitch.
📝 Crafting Effective Prompts for ChatGPT
Crafting the right prompt is key to getting the best results from ChatGPT. It’s not just about what you ask; it’s about how you ask it. Start with a clear instruction, like "Generate five email subject lines for a YouTube video announcement." This specificity helps the AI understand your needs better!
Also, consider using template structures that can be easily modified for different scenarios. The more tailored your prompt, the more relevant the output. Don't forget to utilize the email content from the previous step in your prompt to make it even more contextual!

💾 Saving Outputs to Your Chosen Location
Once you’ve got those catchy subject lines from ChatGPT, it’s time to save them! You can choose to save outputs in various formats and locations, but for simplicity, let’s save them as text files in the designated "Subject Lines" folder in Dropbox.
When setting this up, you'll need to specify both the file name and the content. A good practice is to use the original file name with a suffix, such as "_AutoSubject," to easily identify generated files later. For the content, simply pull in the response from the ChatGPT step—it’s that straightforward!

⚙️ Finalizing and Testing Your Automation
Almost there! After defining your actions, it’s crucial to finalize your automation. This involves reviewing each step to ensure everything is set up correctly. Once you’re satisfied, it’s time to test your automation. Testing is the ultimate safety net—it ensures everything runs smoothly once you go live!
Simply drop a test file into your "Drop Zone Emails" folder, and watch as the automation triggers, generating subject lines and saving them in the "Subject Lines" folder. If everything works as planned, you’re ready to publish your automation!

🎨 Customizing Your Automation Experience
The beauty of automation lies in its flexibility. Once you’ve got the basics down, you can customize your automation to fit your specific needs. Want to add more actions? Go for it! You can integrate additional apps and create a more complex workflow that suits your business perfectly.
Experiment with different triggers and actions—there are thousands of combinations available. The key is to find what works best for you and your workflow. Remember, the goal is to make your life easier and your work more efficient!
Are you ready to supercharge your productivity with AI automation? In this guide, we'll take you through a step-by-step process to automate tasks using ChatGPT and Zapier, making your work life easier and more efficient. Let's dive into the transformative world of automation!
🚀 Introduction to AI Automation
Welcome to the future of productivity! AI automation is not just a buzzword; it’s a game-changer. Imagine having mundane tasks taken off your plate while you focus on what truly matters. With AI, you can streamline your workflow, reduce errors, and save precious time. It’s like having a personal assistant that never sleeps!
From generating email subject lines to managing complex workflows, AI can handle it all. And the best part? You don’t need to be a tech wizard to get started. With tools like Zapier, you can automate tasks in just a few clicks. Get ready to unleash the power of automation!
🛠️ Creating Your First Automation
Alright, let’s roll up our sleeves and dive into the nitty-gritty of automation. Creating your first automation is as easy as pie. Here’s the secret: you’ll be using triggers and actions. A trigger is the event that kicks off your automation, while actions are the tasks that follow.
Don’t worry; it sounds more complicated than it is. For instance, when you upload a file to Dropbox (the trigger), you can automatically generate email subject lines using ChatGPT (the action). It’s a beautiful dance of efficiency!

📋 Setting Up Your Zapier Account
First things first, head over to Zapier.com and sign up for an account. You can use your Google account for a quick setup. Once you’re logged in, you’ll see your dashboard, where all the magic happens.
Zapier operates on a “zap” system, where each automation counts as one zap. You’ll start with a free tier, perfect for experimenting. Once you’ve tasted the sweetness of automation, you might want to explore paid plans for more zaps!
🔄 Understanding Triggers in Automation
Let’s talk triggers! Think of triggers as the starting gun at a race. They signal the start of your automation journey. It could be anything from receiving an email, a new file in a folder, or even a scheduled time.
For our example, we’ll set up a trigger that activates when a new file is dropped into a specific Dropbox folder. This will start the automation that generates email subject lines. Simple, right?

📂 Choosing Your Trigger App: Dropbox
Dropbox is a fantastic choice for our trigger app. It’s user-friendly and integrates seamlessly with Zapier. When you select Dropbox, you’ll have options to choose what event will trigger the automation. In our case, it’s “New File in Folder.”
This means every time you add a new file to your designated folder, the automation will spring into action. Talk about efficiency!

🗂️ Creating Folders for Organization
Organization is key in automation. You’ll want to create specific folders in your Dropbox to manage your files effectively. For our automation, set up a folder called “Drop Zone Emails” where you’ll drop your email files and another folder named “Subject Lines” for the generated outputs.
This way, everything is neatly organized, and you can easily find your files. Plus, it makes your automation process smoother!

🧪 Testing Your Trigger Setup
Before you go full throttle, it’s time to test your setup. Testing ensures everything works as intended. After setting up your trigger, drop a test file into your “Drop Zone Emails” folder and watch the magic happen.
Zapier will scan the folder, and if everything is set up correctly, it will recognize the new file and prepare to trigger the next actions. You’re just a few clicks away from automation bliss!

🔍 Defining Actions After Trigger
Now that you've set up your trigger, it's time to define the actions that follow. This is where the real magic happens! Actions are the tasks that get executed once your trigger is activated. Think of it as the domino effect—once the first one falls (the trigger), the rest will follow seamlessly.
For our automation, we’re focusing on two actions: generating email subject lines with ChatGPT and saving the results in a designated folder. This combination not only saves time but also enhances your productivity. Let's dive deeper into how to set these actions up!
💬 Setting Up ChatGPT as an Action
First up, let’s integrate ChatGPT into your automation! Select ChatGPT as your action app. This will allow you to send prompts and receive responses directly from the AI. You’ll need to choose the event that will trigger the ChatGPT interaction. In this case, we're going with the 'Conversation' event.
After selecting the event, connect your OpenAI account. This seamless integration is crucial for ensuring that your prompts are sent efficiently and the responses are received without a hitch.
📝 Crafting Effective Prompts for ChatGPT
Crafting the right prompt is key to getting the best results from ChatGPT. It’s not just about what you ask; it’s about how you ask it. Start with a clear instruction, like "Generate five email subject lines for a YouTube video announcement." This specificity helps the AI understand your needs better!
Also, consider using template structures that can be easily modified for different scenarios. The more tailored your prompt, the more relevant the output. Don't forget to utilize the email content from the previous step in your prompt to make it even more contextual!

💾 Saving Outputs to Your Chosen Location
Once you’ve got those catchy subject lines from ChatGPT, it’s time to save them! You can choose to save outputs in various formats and locations, but for simplicity, let’s save them as text files in the designated "Subject Lines" folder in Dropbox.
When setting this up, you'll need to specify both the file name and the content. A good practice is to use the original file name with a suffix, such as "_AutoSubject," to easily identify generated files later. For the content, simply pull in the response from the ChatGPT step—it’s that straightforward!

⚙️ Finalizing and Testing Your Automation
Almost there! After defining your actions, it’s crucial to finalize your automation. This involves reviewing each step to ensure everything is set up correctly. Once you’re satisfied, it’s time to test your automation. Testing is the ultimate safety net—it ensures everything runs smoothly once you go live!
Simply drop a test file into your "Drop Zone Emails" folder, and watch as the automation triggers, generating subject lines and saving them in the "Subject Lines" folder. If everything works as planned, you’re ready to publish your automation!

🎨 Customizing Your Automation Experience
The beauty of automation lies in its flexibility. Once you’ve got the basics down, you can customize your automation to fit your specific needs. Want to add more actions? Go for it! You can integrate additional apps and create a more complex workflow that suits your business perfectly.
Experiment with different triggers and actions—there are thousands of combinations available. The key is to find what works best for you and your workflow. Remember, the goal is to make your life easier and your work more efficient!
Are you ready to supercharge your productivity with AI automation? In this guide, we'll take you through a step-by-step process to automate tasks using ChatGPT and Zapier, making your work life easier and more efficient. Let's dive into the transformative world of automation!
🚀 Introduction to AI Automation
Welcome to the future of productivity! AI automation is not just a buzzword; it’s a game-changer. Imagine having mundane tasks taken off your plate while you focus on what truly matters. With AI, you can streamline your workflow, reduce errors, and save precious time. It’s like having a personal assistant that never sleeps!
From generating email subject lines to managing complex workflows, AI can handle it all. And the best part? You don’t need to be a tech wizard to get started. With tools like Zapier, you can automate tasks in just a few clicks. Get ready to unleash the power of automation!
🛠️ Creating Your First Automation
Alright, let’s roll up our sleeves and dive into the nitty-gritty of automation. Creating your first automation is as easy as pie. Here’s the secret: you’ll be using triggers and actions. A trigger is the event that kicks off your automation, while actions are the tasks that follow.
Don’t worry; it sounds more complicated than it is. For instance, when you upload a file to Dropbox (the trigger), you can automatically generate email subject lines using ChatGPT (the action). It’s a beautiful dance of efficiency!

📋 Setting Up Your Zapier Account
First things first, head over to Zapier.com and sign up for an account. You can use your Google account for a quick setup. Once you’re logged in, you’ll see your dashboard, where all the magic happens.
Zapier operates on a “zap” system, where each automation counts as one zap. You’ll start with a free tier, perfect for experimenting. Once you’ve tasted the sweetness of automation, you might want to explore paid plans for more zaps!
🔄 Understanding Triggers in Automation
Let’s talk triggers! Think of triggers as the starting gun at a race. They signal the start of your automation journey. It could be anything from receiving an email, a new file in a folder, or even a scheduled time.
For our example, we’ll set up a trigger that activates when a new file is dropped into a specific Dropbox folder. This will start the automation that generates email subject lines. Simple, right?

📂 Choosing Your Trigger App: Dropbox
Dropbox is a fantastic choice for our trigger app. It’s user-friendly and integrates seamlessly with Zapier. When you select Dropbox, you’ll have options to choose what event will trigger the automation. In our case, it’s “New File in Folder.”
This means every time you add a new file to your designated folder, the automation will spring into action. Talk about efficiency!

🗂️ Creating Folders for Organization
Organization is key in automation. You’ll want to create specific folders in your Dropbox to manage your files effectively. For our automation, set up a folder called “Drop Zone Emails” where you’ll drop your email files and another folder named “Subject Lines” for the generated outputs.
This way, everything is neatly organized, and you can easily find your files. Plus, it makes your automation process smoother!

🧪 Testing Your Trigger Setup
Before you go full throttle, it’s time to test your setup. Testing ensures everything works as intended. After setting up your trigger, drop a test file into your “Drop Zone Emails” folder and watch the magic happen.
Zapier will scan the folder, and if everything is set up correctly, it will recognize the new file and prepare to trigger the next actions. You’re just a few clicks away from automation bliss!

🔍 Defining Actions After Trigger
Now that you've set up your trigger, it's time to define the actions that follow. This is where the real magic happens! Actions are the tasks that get executed once your trigger is activated. Think of it as the domino effect—once the first one falls (the trigger), the rest will follow seamlessly.
For our automation, we’re focusing on two actions: generating email subject lines with ChatGPT and saving the results in a designated folder. This combination not only saves time but also enhances your productivity. Let's dive deeper into how to set these actions up!
💬 Setting Up ChatGPT as an Action
First up, let’s integrate ChatGPT into your automation! Select ChatGPT as your action app. This will allow you to send prompts and receive responses directly from the AI. You’ll need to choose the event that will trigger the ChatGPT interaction. In this case, we're going with the 'Conversation' event.
After selecting the event, connect your OpenAI account. This seamless integration is crucial for ensuring that your prompts are sent efficiently and the responses are received without a hitch.
📝 Crafting Effective Prompts for ChatGPT
Crafting the right prompt is key to getting the best results from ChatGPT. It’s not just about what you ask; it’s about how you ask it. Start with a clear instruction, like "Generate five email subject lines for a YouTube video announcement." This specificity helps the AI understand your needs better!
Also, consider using template structures that can be easily modified for different scenarios. The more tailored your prompt, the more relevant the output. Don't forget to utilize the email content from the previous step in your prompt to make it even more contextual!

💾 Saving Outputs to Your Chosen Location
Once you’ve got those catchy subject lines from ChatGPT, it’s time to save them! You can choose to save outputs in various formats and locations, but for simplicity, let’s save them as text files in the designated "Subject Lines" folder in Dropbox.
When setting this up, you'll need to specify both the file name and the content. A good practice is to use the original file name with a suffix, such as "_AutoSubject," to easily identify generated files later. For the content, simply pull in the response from the ChatGPT step—it’s that straightforward!

⚙️ Finalizing and Testing Your Automation
Almost there! After defining your actions, it’s crucial to finalize your automation. This involves reviewing each step to ensure everything is set up correctly. Once you’re satisfied, it’s time to test your automation. Testing is the ultimate safety net—it ensures everything runs smoothly once you go live!
Simply drop a test file into your "Drop Zone Emails" folder, and watch as the automation triggers, generating subject lines and saving them in the "Subject Lines" folder. If everything works as planned, you’re ready to publish your automation!

🎨 Customizing Your Automation Experience
The beauty of automation lies in its flexibility. Once you’ve got the basics down, you can customize your automation to fit your specific needs. Want to add more actions? Go for it! You can integrate additional apps and create a more complex workflow that suits your business perfectly.
Experiment with different triggers and actions—there are thousands of combinations available. The key is to find what works best for you and your workflow. Remember, the goal is to make your life easier and your work more efficient!


